Beginner's Guide to React-Redux Tutorial : Learn by developing two small applications

I am a Remote Software Engineer working at Clinq Technologies a Redmond based firm. Former experience includes as a frontend developer and as a open source developer at KDE. Always looking forward to learn more about the technologies and interesting problems to work on.
React has gained a lot of popularity as a front-end framework these days. It's one of the leading frameworks used by many organizations for the development of web apps. Moving forward with React you would encounter something called Redux which is a widely used state management tool in React.
In this tutorial, we would see how can you set up Redux and use it in your project. We would be having a look at two different small projects using Redux for state management.
Let's move forward with the tutorial.
Table of contents
What is meant by state management?
What is Redux and when to use it?
Develop a counter application using React-Redux
Develop a search application using React-Redux
1. What is meant by state management?
In simple terms, state management is the communication of data within, and different components of React. A state is basically a JavaScript object that represents part of a component that changes due to certain actions by the user.
A simple example can be an E-commerce application where you click the cart button to view a product or add any new product to the cart.
2. What is Redux and when to use it?
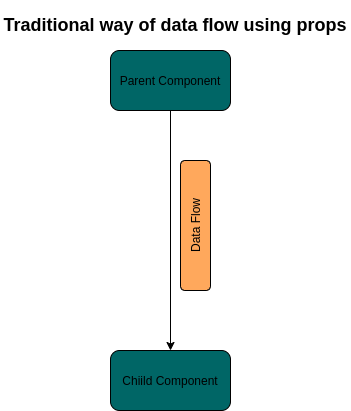
If you have developed React applications, you might be already aware of the fact that React follows a component-based development methodology. The complete UI of the application is divided into different components and then it's merged as a whole. The data flows in component always from the parent component to the child component. Passing data from parent component to child component as props is the most common way for small applications.
But what if we are developing a complex application, and any of the data of a single component needs to be used by another component. This is where we realize the usage of Redux as a state management tool.
Redux is a JavaScript library for state management.
When I started learning Redux, I felt lost with its concepts, and the most disgusting thing was setting up redux in the project.
I am gonna simplify this for you in a simple way. So, you can redux the environment in your application within a few minutes.
Let's see some terminology related to Redux which would be helpful and is good to know before working with Redux in any application.
1. Actions
Think of action as an event that happened in the application. Some common actions can be button click, form submit, etc.
2. Reducers
In simple terms, a reducer is a function that receives the current state of the application, and as per action which causes that state change decides how to update it.
3. Store
The store is the central part of the application where each of the component state is stored.
Let's dive into some code now!!!
3. Develop a counter application using React-Redux
We would first set up a new react project and develop the basic UI of the application. Further, we would work on setting up redux in the app, and managing the counter state with redux.
1. Create a new react app
Create a new react app name as "counter-app" with the below code.
npx create-react-app counter-app
Inside the src folder create a new file as Counter.js. This is the file where we will be creating our counter component.
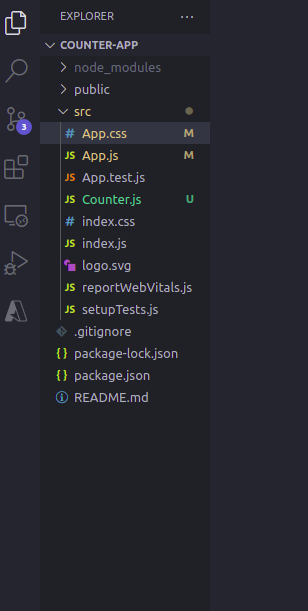
Your folder structure will appear something like this after creating the counter component file.
3. Create the counter component
We would create a new counter component with two different buttons one for increment, and the other for decrement.
import React from 'react';

const Counter = () => {
    return (
      <div className="counter">
        <h2>Counter App</h2>
        <h3>0</h3>
        <button style={{ width: "2rem", marginLeft: "2rem" }}>+</button>
        <button style={{ width: "2rem", marginLeft: "2rem" }}>-</button>
      </div>
    );
}

export default Counter;
Write this code inside the counter.js file we created for the counter component. Let's now render this component in the app. Add this code in App.js to render the counter component.
import "./App.css";
import React from "react";

//import components
import Counter from "./Counter";

function App() {
  return (
    <div className="App" style={{ textAlign: "center" }}>
      <Counter />
    </div>
  );
}

export default App;
After saving this, your app will appear something like this.

3. Setup redux in the application
Till now we have developed the basic UI of our app. Let's now set up redux in our application. To set up redux in our app, we need to install two npm packages. Type the following command in your terminal to install both packages.
npm install react-redux
npm install redux
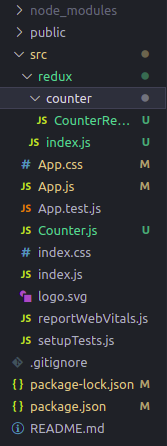
Create a new folder inside redux now. This is the folder where you write all the reducers and create the store. I find this way of doing it much easier. Everyone has their own conventions with the folder structure in redux.
To keep the folder structure in a much better way, and the code clean I prefer to have a different folder inside redux for each different redux component.
Create a counter folder inside src/redux. Also, create CounterReducer.js inside the counter for this component reducer. So in the future, if you have more redux components you can follow the same methodology. This would be a lot easy to manage too.
We will create one more file index.js inside src/redux. This file will be used to create the store for the application.
Your final folder structure will be something like this.
Now, you have perfectly set up redux with your application. Let's write code and let redux manage the state of the counter app component.
3. Using Redux with the app
As if you remember there are three main things in redux the store, actions, and the reducer.
Actions are mainly responsible which causes any state change. In this app, there are two different actions "Click of + button", and the second as "Click of - button". Once there's any action the reducer will update the state as defined. So, we will define two reducers to update the count as of the button clicked.
Let's write the reducer. Inside the redux/counter/CounterReducer write the following code.
// create the initial state object
const initialState = {
  count: 0,
};

export const CounterReducer = (state = initialState, action) => {
  switch (action.type) {
    case 'INCREMENT':
      return {
        ...state,
        count: state.count + 1,
      };
    case 'DECREMENT':
      return {
        ...state,
        count: state.count - 1,
      };
    default:
      return state;
  }
};
The reducer function takes two arguments. The first is the initialState, and the second one is action.
Further, we name two different actions INCREMENT and DECREMENT. One will increase the count value, and the other would decrement the count value. A similar syntax is followed to write any of the reducers.
I prefer having all the reducers inside the index.js file so all can be added to the store at once. Write the following code in the index.js file created under the src/redux folder.
import { combineReducers } from "redux";
import { CounterReducer } from "./counter/CounterReducer";

const rootReducer = combineReducers({
    counterReducer: CounterReducer,
});

export default rootReducer;
I have imported combineReducers from redux package to create the root reducer which would have all the reducers of our app. Here, we just have one reducer so I have included that in the combineReducers function.
Let's create the store, and then we would be all good to use the counter state in any part of our application.
I prefer creating store in the App.js file itself. Also, we would use a Provider component from react-redux package that will make the state available to the complete application.
Include the following code in App.js file.
import "./App.css";
import React from "react";
import { createStore } from "redux";
import { Provider } from "react-redux";

import rootReducer from "./redux";

//import components
import Counter from "./Counter";

function App() {
  const store = createStore(
    rootReducer,
  );

  return (
    <Provider store={store}>
      <div className="App" style={{ textAlign: "center" }}>
        <Counter />
      </div>
    </Provider>
  );
}

export default App;
Here, we need to do basically three things. Creating the store for our application using the createStore from redux. Making use of the Provider component to provide make the reducer state available to our application. We are now good to make use of CounterReducer state in any part of our application.
Let's complete the app now by implementing the left functionality of the app. We will be using useSelector hook to access any state from the store, and useDispatch to dispatch any action to the reducer store.
Include this code in the Counter.js file.
import React from "react";
import { useSelector, useDispatch } from "react-redux";

const Counter = () => {

  const dispatch = useDispatch();

// make use of useSelector to access any state variable
  const count = useSelector((state) => state.counterReducer.count);

  return (
    <div className="counter">
      <h2>Counter App</h2>
      <h3>{count}</h3>
      <button
        style={{ width: "2rem", marginLeft: "2rem" }}
        onClick={() => {
           //dispatch the action based on action
          dispatch({ type: 'INCREMENT' });
        }}
      >
        +
      </button>
      <button
        style={{ width: "2rem", marginLeft: "2rem" }}
        onClick={() => {
           //dispatch the action based on action
          dispatch({ type: 'DECREMENT' });
        }}
      >
        -
      </button>
    </div>
  );
};

export default Counter;
I hope the above code makes sense as I have added the comment for dispatch and the useSelector usage.
Congrats, You have developed your first app by making use of React-Redux.
In the next part of the blog, I will write how to develop a search application by using Redux.


